A
depth micrometer is used to measure the depth of holes, slots,
counterbores, recesses, and the distance from a surface to some recessed
part. This type of micrometer is read exactly opposite to the method
used to read an outside micrometer. The zero is located toward the
closed end of the thimble. The measurement is read in reverse and
increases
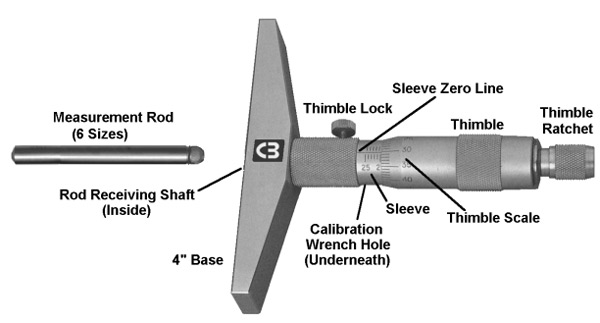
in depth amount as the thimble moves toward the base of the instrument.
The micrometer depth gage consists of a flat base attached to the barrel
(sleeve) of a micrometer head. It has a range of 0 to 6 inches,
depending on the length of the extension rod used. The hollow micrometer
screw (the threads on which the thimble rotates) has a range of 1 inch.
The flat base is 4 inches and six extension rods are supplied with this
gage.
The measurement rods simply snap into the rod-receiving shaft. There are
no set screws to mess with.
Calibration is simply made by inserting the 0-1 rod and turning the
thimble counterclockwise so the measurement rod tip is recessed
completely into the base. Firmly hold the base flush on a flat surface
while turning the thimble ratchet clockwise until the measurement rod
tip is stopped by the flat surface and the ratchet “clicks” three times.
Tighten the thimble lock. The sleeve zero line should line up with the
zero on the thimble scale. If they are not aligned, position the tip of
the calibration wrench in the calibration wrench hole on the sleeve and
rotate the sleeve to achieve alignment.
To make an actual measurement:
First choose the measurement rod suitable for the depth to be measured.
Clean the mounting surfaces of the measurement rod and the rod-receiving
shaft. Insert and rotate the measurement rod into the rod-receiving
shaft to seat it completely. Turn the thimble counterclockwise so that
when the base is flush on the top (reference) surface, the measurement
rod does not touch the surface to be measured. Holding the base firmly
on the reference surface, rotate the thimble ratchet clockwise until it
“clicks” three times (as the measurement rod stops on the measurement
surface). Read the depth measurement. No need to go into detail on how
to actually read the scales – that instruction can be found in the
outside micrometer section.