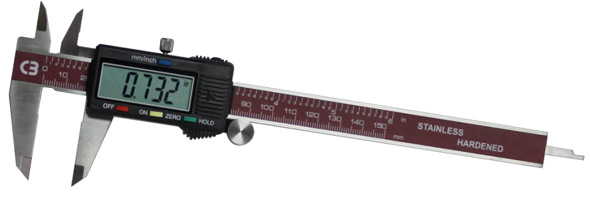
How to care for and use a Digital Caliper


A digital caliper is a precision tool that can be used to accurately determine the dimensions of most objects. As with any precision instrument, proper usage and care is very important. Following the suggestions below will maximize the user’s satisfaction with the caliper, increasing the accuracy of the measurement and lengthening the useful life of the tool.

Do not operate a digital caliper near any strong magnetic field. Never apply voltage (e.g. engraving with an electric pen) on any part of this caliper for fear of damaging the circuit


Before using the caliper, unlock the top thumbscrew and clean the jaws by sliding your finger over both surfaces of the jaws. Pay special attention to the jaw tips. Dirt, grease, and small particles tend to accumulate here. This will make sure that nothing affects the setting of the zero position. After cleaning, close the jaws together and then press the Zero Button to set the zero point.

When measuring round stock (bars), don’t rotate the piece in the jaws while applying pressure. Open the jaws, rotate the bar, and then close the jaws to make your measurement. This technique will preserve the flatness of the jaw surfaces.

Use the thickest part of the jaws to make your measurement whenever possible. Using the knife-edged jaw tips repeatedly (which are thin) will cause excessive wear on this area over time. The thick, flat areas also provide a positive “feel” when measuring an object. This will help eliminate any “tilt” between the jaws and the work piece that can cause an error in the measurement.

Don’t ever use a caliper as a ‘prying’ tool. Be careful not to drop your caliper onto a hard surface, which could easily result in bent jaw tips. Bent tips prevent accurate measurements by interfering with the complete closure of the jaws. Don’t lay a caliper on your machining equipment (when running) where it can fall onto the floor. Instead make your measurement at a bench or desk nearby.

Do not remove or tamper with any part of a digital caliper other than the battery cover and battery.


Measurement Techniques:

Digital calipers are becoming more and more popular due to the ease of operation, multifunction and high resolution.
They are simple to read. The upper right hand corner displays either ‘mm’ or ‘in’ depending on which read mode has been selected.
When in ‘inches’ mode the far left number before the decimal point is whole inches. The first number to the right of the decimal is ‘tenths of inches. The second number to the right of the decimal is ‘hundredths’ of inches. The third number to the right of the decimal is ‘thousandths’ of inches. A fourth number (a small 5) will pop up when the slide is between thousandths indicating 5 tenths of thousandths (or a half of thousandths). Typically the display is read as thousandths to keep things simple. The display in this picture would read as 732 thousandths.


If the small 5 is displayed it would simply read 732½ thousandths.


When in ‘mm’ mode the number(s) to the left of the decimal point are whole millimeters. The first number to the right of the decimal is ‘tenths of millimeters. The second number to the right of the decimal is ‘hundredths’ of millimeters. The display in the picture would read 18.61 millimeters.


Function Buttons –


Pressing the ON button once will cause the display to turn on. Also, just sliding the scale will activate the display. Once it is ‘on’, pressing the ON button again will zero the value regardless of the position of the slide. From that reference point any movement will display the difference: sliding to the left will display a negative value and sliding to the right will display a positive figure. This feature makes it convenient to make comparison between two measurements.

The ‘mm/inch’ button toggles between metric and inch display. Note that when a caliper is turned on it will always display in whatever mode it was in before it was turned off.

Most calipers do not have a HOLD button. But if they do, pressing the HOLD button will ‘freeze’ the display and will show a constant value regardless of any movement on the slide of the caliper. If the caliper should be turned off (with the display ‘frozen’) that same value will display when turned back on. It will remain at that value until the hold button is pressed again to toggle the hold feature off. Note that if the caliper is turned off (when in the hold mode) it must be turned on again using the ON button. Just sliding the scale will not activate the display.
The HOLD feature is handy for freezing the display when the surrounding light conditions are poor or there’s a blind spot prohibiting a read. In that case you can make a measurement, press HOLD, and not worry about moving the slide (which would change the value) as you bring it into better light to read the display.
The OFF button simply turns the display off. Also, the caliper will turn off automatically after a period of no activity to save battery life.

A note on Replacing the Battery:

The battery will need replacing if the display blinks off and on every second or does not show anything. Follow the procedure below.

Step 1: Remove the battery cover by pressing down slightly with your thumb and slide the cover away from the display.

Step 2: Remove the old battery.

Step 3: Install a new battery with the “+” side up. Slide the cover back to the closed position.

Note: If the display is not working properly after the new battery is installed, remove the new battery and wait 45 seconds to reinstall the battery again. It may be necessary to repeat this process a couple of times. The caliper must be completely drained of power before a proper initialization can occur. (Note: This procedure can also correct a caliper that is not counting or shows other problems. Try removing and replacing the battery using this technique before contacting Chicago Brand for repair.)


Class Dismissed!


Purchase Our Products at the following retailers:


Close Window


Chicago Brand Home Page